I've finally moved everything from my old website to the blog!
Everything from now on will be new and fresh!
Thursday, July 15, 2010
Miss Trude's
I've included this piece for completeness only. I'm not particularily proud of this piece anymore, and I will be turning it into a ruined structure when time permits.
 The first piece I decided to build for my city gaming board was a base of operations for my gang of street girls and doms. I wanted to give them a fortified building, but a simple apartment building would have been too dull. I decided to go with a seedy gentlemen's club theme instead. Miss Trude's Live Nude Girls is a plain building with loud signs that attracts loud and unruly clientelle.
Miss Trude's is simply two foamcore boxes stacked on top of each other. The second floor and roof are removable to allow access to the inside.

The first and second floor walls were constructed by cutting a 1/4" notch off of the end of the foamcore, removing one layer of card and the foam inside. The outside layer of card was left intact and was glued to the edge of the next piece of foamcore. This allowed the exposed foamcore edge to be covered up.
A doorway was cut into the front and back of the first floor. Doors were built and installed, and then the first floor was glued directly to the 12" x 12" double- corrugated cardboard base (with edges covered with masking tape to cover the corrugations, as usual.) A floor was made of foamcore for the second floor, with a notch cut out for the stairway and a hole cut for the pole to the first floor. The roof was also made of foamcore with a notch cut out for the roof hatch.

The sidewalk was added my cutting into the cardboard base, then using a blunt pencil to push in the cuts to give the impression of concrete pavers.
Once the floors were assembled and dry the carpeting was put in place. The carpeting is a type of felt with an adhesive backing on it. I bought it at craft store for $1.00 a piece and the building required 2 pieces.
Thin card was used to trim the building. It also helped hide the seams between the stackable floors and keeps the roof and second story from moving around while the building floors are stacked on each other.
The doors were made by folding a piece of card in half and glueing a length of wire in the crease. The folded card was then glued to itself and the ends of the wire were inserted into holes in the base and in the top of the door opening.
The stairs were built by stacking varying lengths of foamcore and glueing them together. The interior walls are simply foamcore.

The stages are thick plastic card mounted on foamcore. Holes were drilled to accomodate the poles, which are just bamboo skewers. The stages were painted outside of the building and glued into place after the interior was painted.
Some other odd bits were added here and there; a hatch was added to the roof, a piece of model railroad track acts as the ladder to the roof. The vent- thing on the roof is just an old T.V tuner knob.
The sign on the roof was made of corrugated plastic and bamboo skewers for supports.

The exterior of the building was hand painted with textured paint. Two coats were applied for best coverage. The outside was then drybrushed a dark grey, then light gray and finally white.
The interior walls were painted pink. The paint was slopped on, giving the impression of worn, patched and repainted walls. The doors were painted grey on the outside, and the sign and vent on the roof were drybrushed silver.

The stages were painted with gold poles and red tops. The surface of the stages were then given a clear gloss coat.
The carpeting was drybrushed in browns and blacks to give the impression of lots of dirty feet tracking through the club.
The signs were created using Microsoft Word and the posters on the walls are scans of callgirl cards I picked up in Las Vegas (I KNEW those things would come in handy.) They were given a light gray drybrush to tone the colors down.

Underhive Buildings
Here are a couple of old terrain pieces that don't seem to have a home yet. It's been a long time since I built them so let me try to walk though the process, if I can remember.
The Egg Room

This is a survivor from my original underhive set. The walls and floor are all metal panels from inside computers; fan covers, power supply cases, etc. They were arranged in a manner that let them look most like a room and actually hot glued together. Suprisingly the hot glue has held up all these years! Cross stitch fabric was glued over some some of the openings, and distressed to allow egress through them during gameplay.

The alien pods are wooden eggs purchased at a craft store. They were also glued in place with hot glue.

The entire piece was primed black and painted hunter green. The structure was drybrushed a few lighter shades of green. The pods were painted brown and given a green ink wash. They were then drybrushed a ligher shade of brown. The slime effect on the pods was achieved simply by stringing hot glue down the eggs.

Industrial Structure

This piece is a sister piece to the Pumping Station. This one is also based off of the case from a Battlebots RC car. All of the techniques used on the first piece were also used here.
 Details were added using wire, straws, N scale railroad tracks, cross stitch fabric, and some numbers off of an old clock. The biohazard sign was clipped form an industrial supply catalog and glued into place.


The Egg Room

This is a survivor from my original underhive set. The walls and floor are all metal panels from inside computers; fan covers, power supply cases, etc. They were arranged in a manner that let them look most like a room and actually hot glued together. Suprisingly the hot glue has held up all these years! Cross stitch fabric was glued over some some of the openings, and distressed to allow egress through them during gameplay.

The alien pods are wooden eggs purchased at a craft store. They were also glued in place with hot glue.

The entire piece was primed black and painted hunter green. The structure was drybrushed a few lighter shades of green. The pods were painted brown and given a green ink wash. They were then drybrushed a ligher shade of brown. The slime effect on the pods was achieved simply by stringing hot glue down the eggs.

Industrial Structure

This piece is a sister piece to the Pumping Station. This one is also based off of the case from a Battlebots RC car. All of the techniques used on the first piece were also used here.


Wednesday, July 14, 2010
1/72 Crates


I sure wish I still had these as they would be great objective markers now that I have started collecting 1/72 figures.

Warjack Fueling Station- Painting


The tanks, regulator, pipes and pump were painted with this technique from Brush Thralls. The only difference is I sponged on a light layer of GW Boltgun Metal as the last step.

Pump pistons were painted GW Boltgun Metal, all valve handles were painted red, and the ladder was done in wood colors. I didn't paint the CD before laying down the sand, so you could see the reflective surface even after priming. To remedy this I inked the entire base in brown. The base was then drybrushed a dark brown to a medium brown.


Small lengths of twine were cut and untwisted. They were glued along the edges of the tank with white glue. The ground cover is the standard mix. The bush is a bit of green lichen with course turf glued on. A small amount of watered down white glue was gently brushed to the course turf and some ground tea leaves sprinkled on top. The tea leaves are too much.


Warjack Fueling Station- Construction
I built this as something quick for May-June Terragenesis Terrain Competition. The only requirement was that it had to fit onto a CD. After finishing the tedious and not- too- creative Axis and Allies Miniatures terrain, I needed to build something. This is what I came up with.
I play Warmachine but know little about the background story. I figured warjacks are steam powered and have a boiler, so they would have to lug around water to create steam. Right? So this is a water fueling station. Or it could be the largest keg in the Iron Kingdoms. Either way I'm happy. Click pictures for larger views.

The core of the project, or "water tank", is the bottom half of a contact lense saline bottle. This was hot glued to the CD. A pumping arm was built from two lengths of drinking straw and two plastic card pieces cut to size. The grommets at the bottom of the pump pistons are donut- shaped beads.

The roof is made from the top, tapered portion of the bottle. The nozzle was cut off and an old hatch from a GW Rhino glued into place. The entire piece was hot glued into place.

The fueling nozzle and regulator are made from the exhaust off of a Ferrari model. This was mounted onto a piece of thin card glued to the tank. Another piece of card was attached next to the pump to accomate an instrument cluster. The three gauges are made from lights from a model car.

The verticle pipes are simply drinking straws. Rivets were punched out of thin plastic with a leather punch and glued into place with super glue. These were used on the mounting plates for the instrument cluster and fueling regulator, as well as on the pump mechanism. Valve handles on the top hatch, verticle pipes and fueling nozzle are nylon snaps for womens clothing.

A bead of hot glue was run down the seams on the top and sides of the tank to simulate a weld. This was also done around where the verticle pipes attach to the tank. The ladder is a modified MegaBloks Dragons toy.
The base is simply covered in sand attached with white glue.
I play Warmachine but know little about the background story. I figured warjacks are steam powered and have a boiler, so they would have to lug around water to create steam. Right? So this is a water fueling station. Or it could be the largest keg in the Iron Kingdoms. Either way I'm happy. Click pictures for larger views.

Starting components: CD, Bottle bottom, beads and pumping mechanism.
The core of the project, or "water tank", is the bottom half of a contact lense saline bottle. This was hot glued to the CD. A pumping arm was built from two lengths of drinking straw and two plastic card pieces cut to size. The grommets at the bottom of the pump pistons are donut- shaped beads.

The roof is made from the top, tapered portion of the bottle. The nozzle was cut off and an old hatch from a GW Rhino glued into place. The entire piece was hot glued into place.

The fueling nozzle and regulator are made from the exhaust off of a Ferrari model. This was mounted onto a piece of thin card glued to the tank. Another piece of card was attached next to the pump to accomate an instrument cluster. The three gauges are made from lights from a model car.

The verticle pipes are simply drinking straws. Rivets were punched out of thin plastic with a leather punch and glued into place with super glue. These were used on the mounting plates for the instrument cluster and fueling regulator, as well as on the pump mechanism. Valve handles on the top hatch, verticle pipes and fueling nozzle are nylon snaps for womens clothing.

A bead of hot glue was run down the seams on the top and sides of the tank to simulate a weld. This was also done around where the verticle pipes attach to the tank. The ladder is a modified MegaBloks Dragons toy.
The base is simply covered in sand attached with white glue.
Underhive Terrain- Bridges Part 2
Again, all of the bridges are based on a double layer of foamcore; the top layer about 1/2" longer than the bottom. This gives the bridge a little "lip" to place on a platform and helps keep the bridge from sliding around too much. A short description of each type of bridge is below:
The Post Bridge

This short bridge uses the off- cuts of K'nex pieces for posts along the edges. Decking is done in granny grating. Edges are covered in drinking straws. The decking is drybrushed silver. The posts are yellow.
The Heavy Bridge

This bridge has PC hard drive brackets for railings. Drinking straws cover up any other exposed edges. Decking is granny grating. Painted tan, inked brown and drybrushed again.
Normal Bridges

These bridges are simple in construction. The left bridge simply has cross stitch fabric as the base, and thin card glued over the sides and top. Sections were cut from the card on top and it was simply glued over the decking. The bridge on the right also uses the fabric decking. The walls are thin card, the supports matchsticks cut to length and glued into the holes in the fabric. Punched plastic rivets accect the piece. Painting is green and silver, inked chestnut ink and black, then drybrushed.

Underhive Terrain- Bridges Part 1
All of the bridges are based on a double layer of foamcore; the top layer about 1/2" longer than the bottom. This gives the bridge a little "lip" to place on a platform and helps keep the bridge from sliding around too much. A short description of each type of bridge is below:
The Archaic Bridge

Named such because that's what it's called at Terragenesis. I basically copied that bridge. The entire piece is built from foamcore. The rods are bamboo skewers pressed through the foamcore. Strips of card were glued across the large arches and along the sides to cover the foamcore edges. A layer of white glue was spread over the other exposed edges. It covered like crap, like always. Plastic rivets were glued all over the bridge and the decking is cross- stitching fabric.
 The bridge was primed black, then painted burnt sienna to give it a completely rusted look. Several brown washes were applied, and when dry orange was drybrushed all over.
The Metal Bridge

This T-shaped bridge was decked with cross- stitching fabric. The low railings are the discarded pieces of the floppy disk bulkheads. Little triangles were cut from plastic card and used as supports for the railings. The edges of the bridge were also covered in floppy disk parts. The entire piece was primed black and drybrushed silver. The whole thing was then inked with GW Chestnut Ink. It was then drybrushed with a bit of brown and burnt sienna.


The Disk Bridge
This bridge is pretty standard contruction. A couple of CD's were glued to the edges with hot glue (thanks N'Sync!) Small plastic jewels were glued to the center. Thin card was used to cover the edges, and plastic rivets were glued into place. Decking is granny grating again. This piece was painted orange, washing in brown, then highlighted again.

The Archaic Bridge

Named such because that's what it's called at Terragenesis. I basically copied that bridge. The entire piece is built from foamcore. The rods are bamboo skewers pressed through the foamcore. Strips of card were glued across the large arches and along the sides to cover the foamcore edges. A layer of white glue was spread over the other exposed edges. It covered like crap, like always. Plastic rivets were glued all over the bridge and the decking is cross- stitching fabric.

The Metal Bridge

This T-shaped bridge was decked with cross- stitching fabric. The low railings are the discarded pieces of the floppy disk bulkheads. Little triangles were cut from plastic card and used as supports for the railings. The edges of the bridge were also covered in floppy disk parts. The entire piece was primed black and drybrushed silver. The whole thing was then inked with GW Chestnut Ink. It was then drybrushed with a bit of brown and burnt sienna.


The Disk Bridge
This bridge is pretty standard contruction. A couple of CD's were glued to the edges with hot glue (thanks N'Sync!) Small plastic jewels were glued to the center. Thin card was used to cover the edges, and plastic rivets were glued into place. Decking is granny grating again. This piece was painted orange, washing in brown, then highlighted again.

Underhive Terrain
This terrain project is a second attempt at usable terrain for Games Workshop's Necromunda game. My first set was large, ugly and completely incompatible with the carboard and plastic stuff put out by GW so it was disassembled and all pictures removed from the website due to a confrontation with a GW lawyer- type thug.
This second project has been designed to be completely compatible with the the GW set. All towers are 3" high to match up with the bulkheads in the GW set. Click pictures for a larger view.
The Platforms
The core of the collection is 15 platforms. They are all based on half of a metal tin AOL sent their junk CDs in for awhile. On top of these a bottle or container of some type (mostly saline and shampoo bottles) were glued to the center. These were measured so the platform plus the bottle were 3" high. Each of these will be stacked on top of each other to create the dizzying underhive.

On each side of the platform a set of holes were drilled 1/4" off each side of the center. A piece of wire was then bent into a "U" shape and run through the holes. The ends of the wire were then turned up to create hooks where ladders and bulkheads could be hung from to allow the set to be as flexible as possible.
On two opposite corners of each platform a 90 degree K'Nex adaptor was glued in place. A set of K'Nex rods were cut to size. These rods will connect the stacked platforms together to stabilize them during gameplay. They also add to the idustrial pile- 'o- crap look of the underhive.
Various pieces from model kits and my bitz box were glued on the tower portions to give them a suitable industrial look. Also, bits of thin card were cut from old VHS video boxes and glued onto the towers. Seed beads were glued on with super glue for rivets. Many of these started falling off right away. The super glue marks kind of looked like rivets so they were left as- is. The rest of the rivets were punched from plastic food container lids with a leather punch.
 Ladders and Bulkheads
The ladders for the project were simply HO guage railroad tracks with the rails removed and cut to size. Holes were drilled in each laddersto it could be hung from the platforms.
The Bulkheads are 3.5" floppy disks that were split in half and then glued back together inside out. 1/2 inch was trimmed off the bottom of each one and a couple holes drilled towards the top so they could be hung from the platforms.
The ladders and bulkheads were primed black. The ladders were simply drybrushed silver. The bulkheads were base coated either silver, blue or green, then given various black, brown and burnt sienna washes to dirty them up. The were then drybrushed to bring out what little detail there was.
This second project has been designed to be completely compatible with the the GW set. All towers are 3" high to match up with the bulkheads in the GW set. Click pictures for a larger view.
The Platforms
The core of the collection is 15 platforms. They are all based on half of a metal tin AOL sent their junk CDs in for awhile. On top of these a bottle or container of some type (mostly saline and shampoo bottles) were glued to the center. These were measured so the platform plus the bottle were 3" high. Each of these will be stacked on top of each other to create the dizzying underhive.

On each side of the platform a set of holes were drilled 1/4" off each side of the center. A piece of wire was then bent into a "U" shape and run through the holes. The ends of the wire were then turned up to create hooks where ladders and bulkheads could be hung from to allow the set to be as flexible as possible.
On two opposite corners of each platform a 90 degree K'Nex adaptor was glued in place. A set of K'Nex rods were cut to size. These rods will connect the stacked platforms together to stabilize them during gameplay. They also add to the idustrial pile- 'o- crap look of the underhive.
Various pieces from model kits and my bitz box were glued on the tower portions to give them a suitable industrial look. Also, bits of thin card were cut from old VHS video boxes and glued onto the towers. Seed beads were glued on with super glue for rivets. Many of these started falling off right away. The super glue marks kind of looked like rivets so they were left as- is. The rest of the rivets were punched from plastic food container lids with a leather punch.

The ladders for the project were simply HO guage railroad tracks with the rails removed and cut to size. Holes were drilled in each laddersto it could be hung from the platforms.
The Bulkheads are 3.5" floppy disks that were split in half and then glued back together inside out. 1/2 inch was trimmed off the bottom of each one and a couple holes drilled towards the top so they could be hung from the platforms.
The ladders and bulkheads were primed black. The ladders were simply drybrushed silver. The bulkheads were base coated either silver, blue or green, then given various black, brown and burnt sienna washes to dirty them up. The were then drybrushed to bring out what little detail there was.
Two Story Fortifcation
The first thing I did is cut out the shape of the hill I wanted the bunker mounted into from a piece of 1" insulation foam. I then traced this shape onto a piece of cardboard. This acts as the floor of the bunker and keeps it connected to the hill.

I then cut out a notch from the foam to accomodate the bunker. In this case it is a 3"x3" square. This starts at the very edge of the hill and goes in. Once the bunker was cut out of the hill I glued the cardboard base in place. I forgot to cover the corrugations with carboard as you can see in the picture. Don't forget to do that!!
All of the corrugated steel is made from corrugated paper. You can buy it by the roll. I got mine at a dollar store.
A 3" x3" square was glued to the carboard base to serve as the floor for the bunker. White glue was used, and it soaked the paper backing off of the corrugated paper. Clamps had to be used to keep the paper down while drying. Two strips were cut and glued along the inside of the hill; one facing out and one facing in. These formed the walls of the lower story.
Chopsticks were cut to length and superglued into each corner to support the upper level.
A 3" x 3" square of cardboard was cut for the upper level. This was centered over the posts and glued into place. Glueing the upper floor in place was a huge mistake. Now it's nearly impossible to get models into the lower level.
Corrugated paper was glued to the base of the upper floor. A thin strip was also glued around the front three side of the upper level. This would give the upper wall something to be attached to.
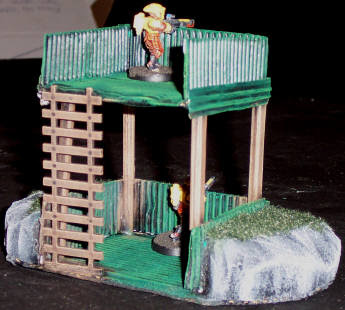
The surrounding wall on the upper level is constructed the same way as the wall for the lower level. An HO scale model railroad trask was used for a ladder. The rails were pulled off with a plier and then it was cut to length.
The piece was primed black (the hill brushed, the rest sprayed.) The corrugated steel was drybrushed dark green to a lighter green. The ladder and posts were painted like wood; starting with a dark brown drybrush up to a light brown. The hill was drybrushed up from dark grey to white.
Static grass was glued to the top of the hill and the piece was complete.
Tuesday, July 13, 2010
Technobridge
I picked up this Armorcast piece for a song at a local hobby shop. It is cast in resin and is a very nice piece. There is lots of detail, and cleaning was quite simple. The piece was primed black and then painting began.
I started off by drybrushing the entire piece silver, but seing that is was going to end to way too plain, even after detailing, I decided to do the edges in hunter green. The wooden parts were painted a very dark brown. Areas that were damaged were left silver, and a thin line of black was painted where the silver meets the green to give the effect of chipped paint.

The entire piece was given a wash of a mix of black paint, water and Future Floor Finish.
Once this was dried the silver parts were gently drybrushed silver again. The wood was drybrushed dark grey, then light grey. The green was lightly drybrushed again with Hunter green, then a slighly light shade was applied by mixing white in the base color.
The rust effects were then added. Surface rust was added simply by stippling burnt sienna over areas of the bridge. The rust streaks were done by loading a brush, removing some of the paint, then gently working it down the slope in long strokes. Citadel Blazing Orange was then lightly stippled onto the flat areas of burnt sienne, and streaked the middle of the runs.

Tank Traps
Another important piece of terrain for wargames is the tank trap. They trap tanks. Or at least keep them from driving where ever they want, until the traps are destroyed. Click on pictures for a larger view.

A standard scenario calls for up to six sections of traps so I created six. These were based on 3" x 6" sections of foam core (no cardboard today, kids.)
The hedgehogs were created by glueing plastic "I" beam rods together in an "X" shape . I mounted three traps per base. After the traps were built, they were hot glued to the bases. I then primed them in a oxide red.
I used these traps hours after I had primed them, and three of them broke off the base during transport to the local gaming shop. two more broke off while we played. Hot glue was NOT the thing to use here. When I got back home, I tugged at each trap still attached to its base to see if it would come off. If it did, I superglued it back on. After making these repairs I covered the bases in the PVA mix and covered them in sand. As soon as the glue was dry, the pieces were basecoated black (I didn't care for the red oxide color.) Painting was done by drybrushing the traps silver, and drybrushing the bases in a medium brown and a tan. I was tired of looking at these things and just wanted them done.

All I need to do is seal them, which I will do with a spray sealant. I just hope the sand won't start breaking off. If it does, I'll coat the bases in PVA, just like my flocked pieces.
These dragon teeth style tank traps were made from plaster poured into an ice cube tray. Once the plaster cured they were knocked out of the tray and attached to strips of foamcore with white glue. They were then primed black and drybrushed dark grey to light grey to white. A sickly green static grass was mixed with some dried tea leaves and applied to the base with white glue.

Styrofoam and Wall Filler Buildings
These two pieces are some of my earliest attempts at making terrain. They use some pieces of styrofoam glued together and some wall filler material to create a quick and easy structure for wargaming. The first piece is a simple building. It was created by using two pieces of styrofoam used to package some kind of electronic device, but I can't remember what. The two halves were simply glued together with PVA and allowed to dry. The outside was then covered in some pre-mixed wall filler compound and slightly smoothed out.

Once the filler was dry, it was sanded down to get rid of any sharp edges or peaks that might be on the piece. A door was made in the front out of card and a handle was taken from a tank model. A thing was glued onto the piece and a couple of straws were also glued on as exhaust ports.
The building was brushed black and drybrushed a dark grey, light gray and finally white. The door, exhaust ports and thing were drybrushed silver. This piece is so stable and strong it wasn't even based.

The second piece is a small bunker I built from offcuts of styrofoam from making hills. It is based on a square of foamcore with masking tape around the edges to hide the foam in the foamcore. The bunker itself is made of "bricks" of styrofoam glued to the base with a removable roof.


The bunker was also coated in wall filler, but a brush was used after application to give the bunker a formed concrete look, much like that on the highways and interstates (at least here in Minnesota). Once the filler was dry, the bunker was painted black, and drybrushed from dark grey to white, just like the above piece.

Subscribe to:
Posts (Atom)